Drawing
Drawing tools
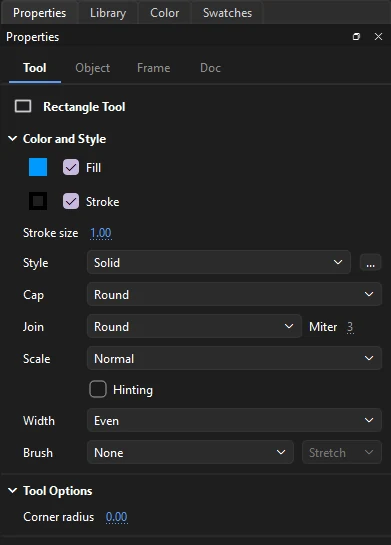
Every tool's settings live on the Properties panel's Tool tab, which appears when you pick the tool. The panel stays on the Tool tab while you draw, even though the shape you just drew is selected; it switches to the Object tab only when you select something with a selection tool. Phoenix remembers each tool's settings between sessions.
Color and style
Tools that draw show a Color and Style section at the top of the Tool tab:
- Fill and Stroke
- The colors to draw with, the same ones as the swatches in the toolbox. Click a swatch to pick a color; uncheck either one to draw without it, for example a rectangle with no outline. Each tool shows only what it draws: the shape tools and Pen show both, the brushes and Paint Bucket only the fill, and the Line, Pencil, Paint Brush and Ink Bottle only the stroke and its style.
- Stroke size
- Line thickness, from 0.1 to 200 pixels.
- Style
- Solid, Hairline (always one screen pixel wide), Dashed, Dotted, Ragged, Stipple or Hatched. The ... button beside it opens Custom Stroke Style for the style's own settings, such as dash length.
- Cap
- How open line ends look: Round, None (flat at the end point) or Square.
- Join
- How corners look: Round, Miter or Bevel. For Miter, the Miter limit beside it stops very sharp corners from spiking.
- Scale
- Whether the stroke thickens when the artwork is scaled: Normal (it does), Horizontal, Vertical, or None (it stays the same width).
- Hinting
- Marks the stroke for pixel hinting. It is saved with the stroke for players that snap thin lines to whole pixels; Phoenix draws the stroke the same either way.
- Width
- How the width varies along the stroke: Even, Taper Both Ends, Taper Start, Taper End, Swell or Pinch. A stroke shaped with the Width tool shows Custom.
- Brush
- A graphic symbol from the library drawn along the stroke instead of a line, set to Stretch (an art brush: the symbol bent from one end of the stroke to the other) or Repeat (a pattern brush: copies of it one after another along the stroke). The stroke size scales the symbol across the stroke.
Pen tools
The Pen tool slot holds four tools for drawing and editing precise paths.
Pen
Press P. The Pen draws a path one point at a time.
| Do this | To |
|---|---|
| Click | Place a corner point |
| Drag | Place a smooth point and pull out its curve handles |
| Alt-drag | Break the handles so the curve can change direction sharply |
| Shift | Keep the segment or handle at a multiple of 45° |
| Click the first point | Close the path; a closed path gets a fill |
| Enter, double-click or Ctrl-click | Finish an open path, drawn as a stroke only |
| Click the last point again | Retract its outgoing handle, so the next segment leaves it as a corner; drag from it to pull a new handle on that side alone |
| Esc | Abandon the path |
| Press on the end of an open path | Carry on drawing from there: any open path's loose end on the frame, or either end of the selected shape's path |
| Finish on the end of another open path | Join the two into one path |
The cursor shows what the next click will do: start a new path, close the path, or add or remove a point. If you switch tools in the middle of a path, Phoenix keeps what you have drawn as an open path.
Add, Delete and Convert Anchor Point
- Add Anchor Point (=)
- Click a path to add a point without changing its shape.
- Delete Anchor Point (-)
- Click a point to remove it. The curve is refitted so it keeps its shape as closely as it can.
- Convert Anchor Point (Shift+C)
- Click a smooth point to make it a corner, or drag from a corner to pull out curve handles.
To move points and handles, use the Subselection tool.
Line
Press N and drag to draw a straight line. Hold Shift to keep it at a multiple of 45°.
Width tool
Press U for the Width tool, which has a toolbox slot of its own, and shape a stroke's width by hand:
- Drag out from a stroke to make it wider there, or in toward its middle to make it thinner. This places a width point, and the width eases smoothly between points.
- Drag a width point's handles to change it. Hold Alt to change only the side you drag.
- Click a width point and press Delete to take it away.
The width belongs to the stroke's style, so strokes of the same style in one shape change together. Each drag is a single step to undo.
Shapes and primitives
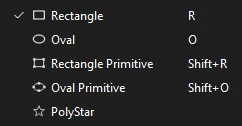
One toolbox slot holds the shape tools. Press and hold it to choose one, or press its key.
| Tool | Key | Notes |
|---|---|---|
| Rectangle | R | Shift draws a square, Alt draws from the center. While dragging, press ↑ and ↓ to round the corners (with Shift for bigger steps). Corner radius sets the rounding before you draw. Alt-click without dragging to type the width, height and corner radius instead. |
| Oval | O | Shift draws a circle, Alt draws from the center. Alt-click without dragging to type the width and height. |
| Rectangle Primitive | Shift+R | A rectangle whose four corner radii stay editable. Draws like the Rectangle, with the same keys. |
| Oval Primitive | Shift+O | An oval with an editable start angle, end angle and inner radius, for pie slices and rings. Set them before drawing with Start angle, End angle and Inner radius. |
| PolyStar | Drag out from the center. Set the number of Sides (3 to 32), and check Star to draw a star; Star point size sets how deep its points are, from long and thin near 0 to a plain polygon at 1. Shift turns it in 45° steps. |
Editing primitives
Select a primitive with the Selection tool and the Object tab shows its options:
- Rectangle Options: the radius of each corner, with Lock corners together to change all four at once.
- Oval Options: Start and End angle, Inner radius as a percentage, and Close path.
- Reset returns the options to a plain rectangle or full oval.
To edit a primitive's points freely, break it apart first (Ctrl+B).
Paint Brush
Press Y and draw freehand to paint with an art or pattern brush. The Paint Brush shares a slot with the Pencil. Choose the brush under Brush on the Tool tab, with Stretch or Repeat beside it: any graphic symbol in the library can be one, such as a leaf, a rope or a chain link. The stroke is fitted like a pencil line, in the Pencil mode and Smoothing you set. To give a stroke already drawn a brush, select it and choose one under Brush on the Object tab.
lists the brushes the document's strokes use and how many strokes use each. Draw With It makes one the brush for new strokes; Take Off Strokes turns the strokes that use it back into plain lines.
Pencil
Press Shift+Y and draw freehand. Phoenix shows how your line will be fitted as you draw, and fits it when you release.
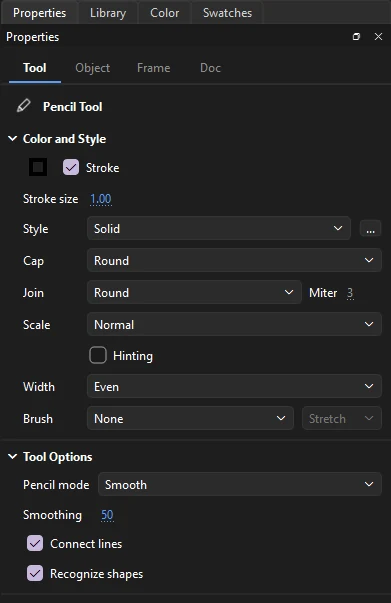
- Pencil mode
- Smooth rounds your line into flowing curves. Straighten turns it into straight segments and clean arcs. Ink keeps it close to exactly what you drew.
- Smoothing
- 0 to 100. Higher values remove more wobble.
- Connect lines
- In Straighten mode, closes a stroke whose ends nearly meet.
- Recognize shapes
- In Straighten mode, turns a rough rectangle or oval into a true one.
Start a stroke on the end of a selected open path to extend it. Hold Shift to draw a straight line across or down: the first few pixels of movement choose which.
Brushes
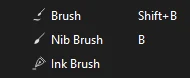
The brush slot holds three brushes: the Brush (B), the Nib Brush (Shift+B) and the Ink Brush, which has no key until you give it one. All three paint filled shapes in the fill color, use your tablet's pen pressure, and keep their own settings. Hold Shift to paint a straight stroke across or down.
Brush
A brush whose width responds to pressure and speed, with tapered ends.
- Size
- 1 to 200 pixels.
- Pressure
- Lets pen pressure vary the width, down to Min size as a percentage of the full size.
- Velocity
- None, Thin to thick, or Thick to thin: how drawing speed changes the width.
- Taper start / end
- How far each end narrows to a point, 0 to 50%.
- Smoothing
- How much hand wobble is removed.
- Precision
- How closely the final shape follows the stroke, against how many points it uses.
- Roundness and Angle
- The shape of the tip: lower roundness gives a flat, calligraphic nib turned to the angle.
Nib Brush
A brush with a shaped nib, set by Size and Nib shape: Round, Oval, Square, Rectangle, Vertical line, or one of two diagonals. Use pressure lets pen pressure vary the width, Use tilt turns the nib the way the pen leans, and Smoothing takes out hand wobble.
Ink Brush
A brush for confident inked lines, unique to Phoenix. Besides Size, Smoothing and Precision, it has:
- Stabilizer
- 0 to 60 pixels. The line trails behind the cursor as if pulled on a string, which irons out shaky strokes. Higher values give smoother, slower lines.
- Pressure
- Soft, Linear or Firm: how quickly the line reaches full width as you press harder.
- Min size
- The width at the lightest pressure, as a percentage of the size.
- Tilt shading
- Tilting the pen broadens the line, like the side of a brush.
Brush modes
The three brushes share a Brush mode that limits where paint lands. Lock fill, also on the brushes' Tool tab, works as it does for the Paint Bucket.
| Mode | Paints |
|---|---|
| Paint Normal | Over everything on the layer |
| Paint Fills | Over fills and empty areas, leaving strokes on top |
| Paint Behind | Only on empty areas, behind existing artwork |
| Paint Selection | Only inside the selected fill |
| Paint Inside | Only inside the fill where the stroke starts |
| Repaint | Only over fills already there, recoloring them; nothing lands on empty areas |
Press Esc during a stroke to cancel it.
Brush Properties and presets
Click Brush Properties and Presets... on the Tool tab of the Properties panel to open every setting of the brush in hand. Changes apply as you make them, and the window can stay open while you paint.
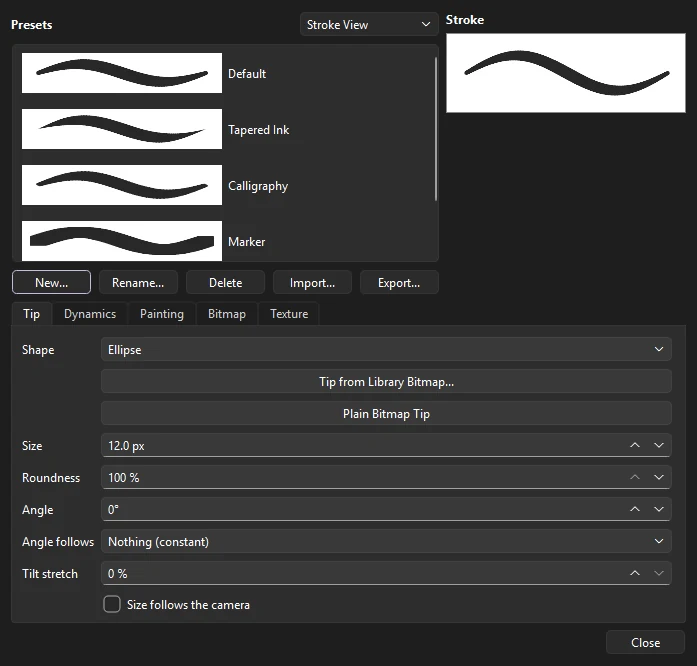
Presets are named brushes. Each brush keeps its own list, and the bitmap brush keeps another. Each preset shows the stroke it paints: choose Small Thumbnails, Large Thumbnails or Stroke View above the list. Click a preset to use it. New... keeps the brush as it is now as a preset; Rename... and Delete do what they say. Export... writes the list to a .phxbrushes file to share, and Import... adds the presets in one. A preset holds the tip and its dynamics, and also the texture, the bitmap brush's settings and the painting options.
- Tip
- Size, Roundness and Angle. Shape: Ellipse, Rectangle, Triangle, Diamond, Hexagon, Star, or Custom. Tip from Library Bitmap... traces a library bitmap's outline as a custom tip; the bitmap brush stamps the image itself. Angle follows: nothing; the stroke's direction (heading), as a calligraphy pen held to the line; the way the pen leans (azimuth); or the turn of an art pen's barrel (twist). Tilt stretch lengthens the tip as the pen leans. Size follows the camera keeps the tip's size on screen while a camera zooms, so the line looks the same width in the shot.
- Dynamics
- Pressure, with Invert pressure to make pressing harder paint thinner, a minimum size and a response curve. Tilt that broadens the line, with Invert tilt. Speed, with a sensitivity for how quickly speed has its full effect. Taper by a percentage of each stroke or a distance in pixels, so short and long strokes taper alike. Smoothing, precision and the stabilizer.
- Painting
- The brush mode, as on the Tool tab. Auto fill fills a stroke that closes on itself, so an outline drawn around a shape comes out solid. Snap to guides: a stroke begun on a ruler guide keeps to it, which gives straight inked edges.
- Bitmap
- The bitmap brush; see below.
- Texture
- See below.
Textured brushes
A brush can paint with a grain, as chalk takes the tooth of the paper. Choose the Texture on the Tool tab: one of Phoenix's own, such as Paper, Watercolor Paper, Chalk, Charcoal, Crayon, Sponge, Canvas or Halftone, or a library bitmap. Grain size and Grain strength set how large it is and how much paint it takes away where it is lightest. In Brush Properties you can also move the grain (Offset X, Offset Y) and turn it (Rotation) so neighboring strokes don't share it. Pressure sets the strength shows more grain at a light touch. Fixed to the frame keeps the grain the same size in the rendered frame as a camera zooms or the art is scaled. Without it, the grain scales with the art.
A textured stroke stays an object of its own, so merging never spreads its grain. To change the grain of a stroke already painted, or to give any shape one, select it and use the Texture section of the Object tab. In an FLA file the grain is kept for Phoenix and also baked for Animate: there the stroke is filled with a small repeating bitmap of the grain in its color, so it looks the same. Opened in Phoenix again, it is the textured stroke you can still change. A grain that keeps its size in the frame is baked at the art's scale, and a grain taken from a JPEG library bitmap shows as plain paint in Animate.
Bitmap brush
Turn on Bitmap brush on the Tool tab to paint pixels into the frame's paint canvas, a bitmap in the library, rather than vector shapes. Any of the three brushes can paint this way, with its own tip and dynamics. The Tool tab also has Softness, Opacity and Erase pixels; every setting is on the Bitmap page of Brush Properties:
- Flow
- How much paint each dab lays down. At 100% the paint does not build up where a stroke overlaps itself; below that it does, as an airbrush's.
- Spacing
- How far apart the dabs are, as a percentage of the tip. Wide spacing leaves a trail of separate stamps.
- Hardness and Softness
- Softness is how wide the soft edge is; hardness is how firmly it holds before it falls away.
- Opacity
- How strong each stroke is. Pressure sets the opacity and Pressure sets the flow let a light touch lay less paint.
- Fade in and Fade out
- The paint fades in over the start of a stroke and out over its end, by a distance in pixels.
- Blend
- How a stroke mixes with the paint already there: Normal, Multiply, Screen, Overlay, Darken, Lighten or Add.
- Tip
- The round soft tip, the tip's shape, or a library bitmap stamped as the tip (Tip from Library Bitmap...; Plain Bitmap Tip goes back). Tip texture puts a grain on the tip itself, turning with it.
- Erase pixels
- Takes paint away instead.
Eraser
Press E and drag to erase merge artwork. Set its Size, and choose an Eraser mode:
| Mode | Erases |
|---|---|
| Erase Normal | Fills and strokes |
| Erase Fills | Fills only |
| Erase Lines | Strokes only |
| Erase Selected Fills | Only the selected fills |
| Erase Inside | Only inside the fill where you start |
Eraser shape picks the nib: round, oval, square, rectangle, a vertical line or a diagonal, and Use pressure and Use tilt let a pen vary its width and turn it as the brushes do. Sync with Nib Brush erases with the Nib Brush's own size, nib, pressure and tilt, so the two stay matched as you switch between them.
Check Faucet to delete a whole fill or stroke with one click. Turning a tablet pen over to its eraser end switches to the Eraser, and turning it back returns to your previous tool.
Paint Bucket and Ink Bottle
The Paint Bucket (K) fills an enclosed area with the fill color, or recolors an existing fill. If your outline has small gaps, choose a Gap size: Don't Close Gaps, or close small, medium or large gaps.
- With a gradient as the fill, drag instead of clicking to lay the gradient along the drag: a linear one from where you press to where you let go, a radial one centered where you press, out to there.
- Fill all regions paints, with one click, every enclosed area of the shape that has the same fill as the one you click: all the empty ones, say.
- Lock fill (also on the brushes) places a gradient or bitmap over the whole stage instead of fitting it to each area, so separate areas read as one sweep of color.
The Ink Bottle (S), in the same slot, works on strokes. Click a fill to add an outline around it, or click a stroke to give it the current stroke color, size and style.
Eyedropper
Press I and click a fill to take its color, or a stroke to take its color and size, or a gradient or bitmap fill to take the whole gradient or bitmap. After you pick up a fill, Phoenix switches to the Paint Bucket so you can apply it straight away; after a stroke, to the Ink Bottle.