Drawing
Color, fills and strokes
Every shape has a fill, a stroke, or both. Fills can be solid colors, gradients or bitmaps; strokes have a color, a width and a style.
Picking colors
The quickest way to set colors is the pair of swatches after the tools in the toolbox: the stroke swatch comes first, drawn as an outline, and the fill swatch, a solid square, after it. Click either one to open a color picker, where you can also set transparency (alpha). The two small buttons above them set a black stroke and white fill, or swap the stroke and fill colors.
The Tool tab shows the same two colors under Color and Style, each with a checkbox to turn it off. To change the colors of artwork that is already drawn, select it with the Selection tool and use the swatches on the Object tab, where the fill also has an alpha percentage. A shape filled with a gradient or bitmap shows Edit... there, which opens its fill in the Color panel; change it and click Apply to Selection to put it back.
Picking a color with the toolbox swatches or the Swatches panel also recolors the selected shapes: a fill color fills them, a stroke color recolors their strokes.
To change one color everywhere it is used in the document, in fills, strokes, gradients and text, use Find and Replace with Color.
To take a color from existing artwork, use the Eyedropper.
The Color panel
Open it from the Color tab in the panel dock, or (Ctrl+Shift+F9). The Fill list chooses the type of fill new artwork gets:
- None
- No fill.
- Solid Color
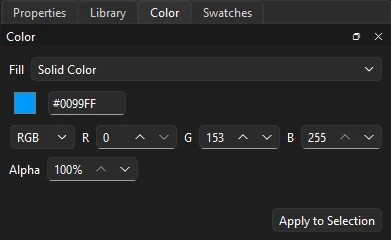
- A single color, with its hex value and its channels.
- Linear Gradient
- Colors blending along a straight line.
- Radial Gradient
- Colors blending outward from a center.
- Bitmap Fill
- An image from the library, tiled across the shape.
To apply the panel's fill to artwork that is already drawn, select it and click Apply to Selection. Apply to Strokes draws the selected shapes' strokes with it instead: a gradient or bitmap along a line, fitted to the lines it strokes.
For a solid color, the panel also shows its channels: choose RGB for red, green and blue (0 to 255) or HSB for hue (0 to 359°), saturation and brightness (percent), and set its Alpha.
Editing a gradient
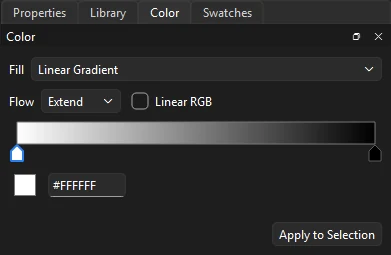
- Click the gradient bar to add a color stop. A gradient can have up to 15 stops.
- Click a stop to select it, then set its color with the swatch or hex field below the bar, or double-click the stop to pick its color.
- Drag a stop sideways to move it, or drag it down off the bar to remove it.
- Flow
- What happens past the ends of the gradient: Extend continues the end colors, Reflect mirrors the gradient back and forth, and Repeat starts it over.
- Linear RGB
- Blends in linear light, which gives brighter, more natural mid-tones between saturated colors.
Bitmap fills
Choose Bitmap Fill, then pick an image from the list of library bitmaps, or click Import... to bring one in. New shapes are filled with the image, tiled.
The Gradient Transform tool
Gradients and bitmap fills are fitted to the shape when you draw it. To change how they sit, press F for the Gradient Transform tool (it shares a slot with Free Transform) and click the fill. Drag its handles to move the center, stretch the gradient or bitmap, and rotate it. A radial gradient also has a handle that scales it evenly and a triangle that moves its focal point off center. The two diamonds, on the top and left edges, skew it: drag one along its edge to slant the fill.
Swatches
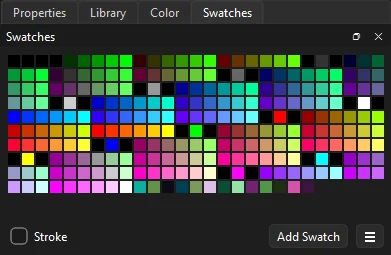
The Swatches panel (, Ctrl+F9) shows the document's saved colors. Click a swatch to make it the fill color, or the stroke color when the panel's Stroke option is checked. Add Swatch saves the current fill color. Right-click a swatch to duplicate or delete it. Swatches are saved with the document, including FLA files.
The ☰ menu beside Add Swatch has the rest:
- Sort by Color
- Grays first, then the colors in hue order.
- Clear Colors
- Leaves only black and white.
- Load Default Colors, Save as Default
- Your own default palette, kept by Phoenix for every document, or the built-in one until you save one.
- Web 216
- The 216 web-safe colors.
- Add Colors..., Replace Colors..., Save Colors...
- Color tables in and out: Adobe Color Table (
.act) files and GIMP palettes (.gpl).
Tagged swatches
Right-click a swatch and choose Convert to Tagged Swatch... to give it a name. A tagged swatch is a color of the linked palette in use: everything already painted in its color is linked to it, and changing it recolors all of that at once. Tagged swatches show a turned-down corner; Edit Tagged Swatch... opens the Palettes panel to change one.
Stroke styles
Besides solid lines, strokes can be Hairline, which stays one screen pixel wide at any zoom, Dashed, Dotted, and three hand-drawn styles: Ragged, Stipple and Hatched. Set the style on the Tool tab before drawing, or on the Object tab for selected strokes. The Ink Bottle applies the whole current stroke style to a stroke you click.
The ... button beside the Style list, on either tab, opens Custom Stroke Style, with a preview stroke drawn as you change it: the dash and gap lengths of a dashed stroke; the dot spacing of a dotted one; a ragged line's pattern, wave height and wave length; a stipple's dot size, dot variation and density; and a hatched stroke's thickness, space, jiggle, rotation, curve and length.
A stroke can vary in width along its length. Choose a profile from the Width setting, or shape one with the Width tool. Variable-width strokes in FLA files keep their profiles.