Animation
Rigs and motion
Build a character out of parts that move together, pose it with sliders and handles, and shape its motion as curves. Everything here saves in ordinary FLA files: other apps that open them play the keyframes and simply leave out what only Phoenix draws.
Pegs
A peg is a layer that holds only a transform. Pick a layer and choose : a peg layer (Peg 1) appears above it and the layer is parented to it. Move, turn or scale the peg (with the Free Transform tool, or tween it) and everything parented to it follows, about the peg's pivot. Parent more layers to the same peg by right-clicking them and choosing it from Parent Layer, or parent pegs to pegs to build a hierarchy. See Layer parenting.
On the stage a peg shows as a crosshair in a circle, in its layer's color, with a tick for the way it faces. It never draws in exports. In the file a peg is an instance of an empty graphic symbol on a parent layer, so the animation plays the same anywhere the FLA opens.
Master controllers
A controller is one slider that drives several properties at once: a head turn that moves the head, swaps the eyes' drawing and turns the nose. Open and choose New.... Then, for each thing it should drive, pick the layer in the timeline, select the controller and choose Bind...: choose the property (X, Y, rotation, scale, scale X, scale Y, alpha, or a graphic's frame) and the values it should have with the slider at 0 and at 1. Both start at the value the layer has now. Remove takes out the selected binding or controller.
Dragging the slider sets every property it drives on the frame shown, as one undo step. A layer with no keyframe there gets one; cut into a tween, the new keyframe takes the in-between and both halves keep tweening. What is saved is ordinary keyframes; the controllers themselves are kept with the document for the next time you open it in Phoenix.
Deformers
A deformer bends a symbol's art by handles instead of redrawing it. Select one or more instances and choose :
- Curve Deformer lays a spine along the art. Drag its square anchors and round handles with the Selection tool and the art bends along it, keeping its thickness: an arm at the elbow, a tail, a sway.
- Envelope Deformer puts a four by four grid of handles around the art. Drag any of them and the art is pulled with it, smoothly, most near the handle: a squash, a stretch, a lean.
The handles show on a selected instance's keyframe. Each keyframe keeps its own pose, and a classic tween goes from one pose to the next. Reset Pose puts the handles back where they started; Remove Deformer takes the deformer off. Shapes are bent; bitmaps and text inside the symbol are not.
Deformed art shows bent on the stage and in everything Phoenix exports: movies, image sequences and passes. Other apps that open the FLA show the art as drawn.
Function curves
shows one property of the layer picked in the timeline as a curve over its frames: X, Y, rotation, scale X and Y, skew, alpha, brightness, tint or a graphic's frame, or the camera's pan, zoom and turn on a camera layer. The curve runs through the tweens between keyframes, as they play, and each keyframe is a dot.
Drag a dot up or down to change that keyframe's value, or double-click it to type one; both are one undo step. Click anywhere else in the graph to go to that frame.
X-sheet
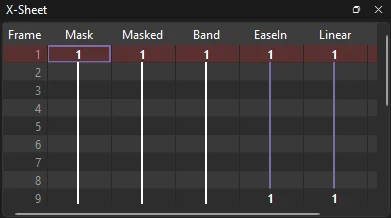
shows the timeline as an exposure sheet: a column per layer, a row per frame, each drawing numbered by its content. Type a drawing number into a cell and press Enter to expose that drawing there, press X to hold, or Delete to clear the cell. The arrow keys move between cells.
Light table
(Shift+L) fades every layer except the ones selected in the timeline, where you are drawing, so you can trace over the other layers without mistaking them for your own.
Multiplane camera
adds a camera layer at the top of the scene, running its full length; a scene has one camera. In , drag each layer nearer to or farther from the camera, so a pan moves near layers faster than far ones.
The Camera tool (C) moves the camera: drag to pan, Shift-drag to zoom and Alt-drag to turn. Each drag keys the camera on the frame shown, and the camera tweens into that keyframe from the one before. Function Curves shows the camera's pan, zoom and turn on the camera layer. Turn off to see the scene without the camera's moves.
The camera can also color the whole picture it sees, to fade a shot to black or white, wash it with a tint or make it see-through. Select the camera layer's keyframe (or use the Camera tool) and choose a Style under Camera Color Effect in the Properties panel: Brightness, Tint, Alpha or Advanced, as for an instance's color effect. The effect is keyed with the camera, tweens from one camera keyframe to the next, and shows on the stage with Camera View on and in movies exported through the camera. It colors the scene's layers; the stage color stays as it is, so for a fade to black over the whole frame, give the scene a background layer.