Workspace
Documents and files
A document holds your stage settings, timelines, library and media. This page covers creating one, the file formats Phoenix reads and writes, bringing in images, sound and video, and getting work back after a crash.
Create a document
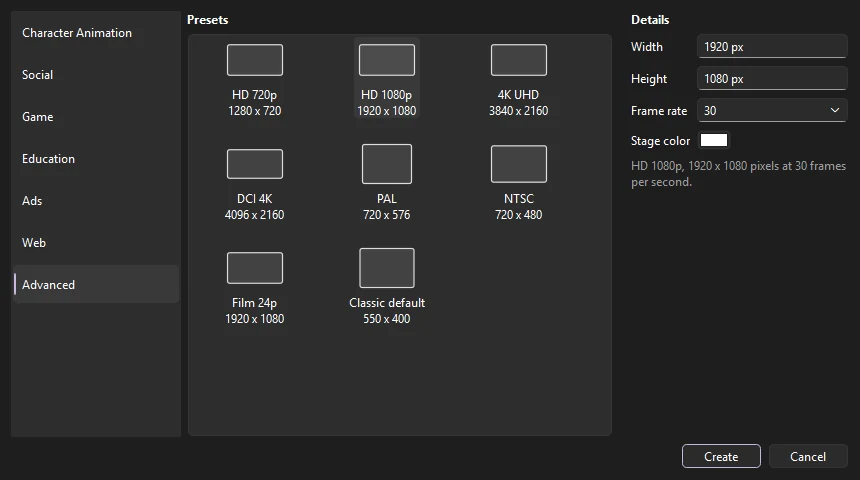
Choose (Ctrl+N). Pick a category on the left, then a preset. The details on the right fill in from the preset, and you can change any of them.
| Category | Presets for |
|---|---|
| Character Animation | Full HD, HD, 4K, standard and widescreen video at 24 fps |
| Social | Instagram post and story, Twitter, Facebook, YouTube and TikTok, at 30 fps |
| Game | Full HD and HD at 30 fps; phone (landscape and portrait) and tablet at 60 fps |
| Education | Full HD, HD, 1024×768 and tablet, at 30 fps |
| Ads | Standard banner sizes, from a 320×50 mobile banner to a 970×250 billboard, at 24 fps |
| Web | Full screen, desktop, laptop, tablet and phone, at 30 fps |
| Advanced | Broadcast and film formats: HD, 4K UHD, DCI 4K, PAL, NTSC, 23.976 fps film, and the classic 550×400 default |
Width and height can be from 1 to 8192 pixels. The frame rate list runs from 8 to 120 fps and includes the broadcast rates 23.976, 29.97 and 59.94; you can also type any rate up to 120. Phoenix remembers your last choice and opens on it next time.
Document settings
To change the settings of an open document, click an empty part of the stage with the Selection tool so the Properties panel shows the Doc tab.
- W and H
- The stage size in pixels.
- FPS
- Frames per second, from 0.01 to 120.
- Stage
- The background color of the stage, which also becomes the background of exported images and video. Give it less than full alpha to make the stage see-through: a checkerboard shows under it, and images and PNG sequences exported on the stage color keep that transparency. The FLA format keeps only the color; Phoenix saves the alpha as a setting of its own.
- Scale spans
- When this is on, changing the frame rate stretches or squeezes every span so animation keeps its timing in seconds. When it is off, each frame keeps its place and the animation plays faster or slower.
- Document Info
- Below the settings: the FLA version the document was saved as, and the app that made it.
The tab also shows which application and file version last saved the document.
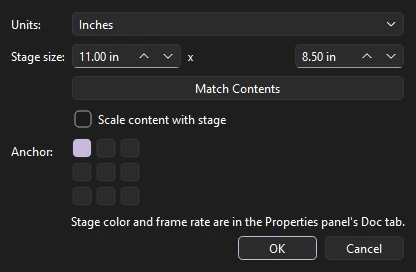
(Ctrl+J) has more:
- Units
- What the rulers count in: pixels, inches, points, centimeters or millimeters. The stage size is shown in the same units.
- Stage size
- The width and height of the stage.
- Match Contents
- Sizes the stage to fit everything on it, in every frame of every scene, and moves the artwork so it starts at the stage's top-left corner.
- Scale content with stage
- When the size changes, everything on the stage grows or shrinks with it, so a scene made for one size fits another.
- Anchor
- When the size changes and the content does not scale, which part of the stage the artwork keeps to: a corner, an edge's middle or the center. The stage grows or shrinks away from it.
Scenes
A document can hold several scenes, which play one after another. The stage and timeline show one scene at a time; its name is in the edit bar above the stage.
Open (Shift+F2) to work with them:
- Click a scene to edit it. Shift+Page Up and Shift+Page Down go to the previous and next scene.
- Add puts a new, empty scene after the current one (or choose ). Duplicate copies the current scene with all its layers and frames.
- Drag scenes to change the order they play in, and double-click one to rename it. Scene names must be different from each other.
- Delete removes the current scene, after asking. A document keeps at least one.
Each change is one step you can undo.
Open and save
| Command | Shortcut |
|---|---|
| Ctrl+O | |
| The last ten files | |
| Ctrl+S | |
| Ctrl+Shift+S | |
| Goes back to the saved file, dropping the changes since | |
| Ctrl+W | |
| Ctrl+Q |
The window title shows the document's full path, with a * after it when there are unsaved changes. Before closing a changed document, Phoenix asks whether to Save, Discard the changes, or Cancel.
Several documents
Each document you open or create gets a tab over the stage, so you can keep several open and copy between them. Click a tab to switch; Ctrl+Tab goes to the next and Ctrl+Shift+Tab to the previous. Each tab keeps its own undo history, playhead, zoom and scroll, and unsaved changes, marked with a *. Every panel shows the document whose tab is in front, and switching tabs stops playback. Drag tabs to reorder them, and click a tab's × or press Ctrl+W to close it. Opening a file that is already open switches to its tab, in whichever window it is. A blank new document you have not changed is replaced by the next file you open.
Right-click a tab for more:
- Close, Close Others, Close All
- Close that tab, every other tab, or all of them. Phoenix asks about any with unsaved changes first.
- Copy Path
- Puts the document's file path on the clipboard.
- Show in Explorer (Reveal in Finder on macOS)
- Opens the folder the file is in, with the file selected.
- Move to New Window
- Opens the document in a window of its own, with its own stage, timeline and panels, so two documents can sit side by side or on two screens. Its undo history, playhead and view go with it. You can also drag a tab off the tab bar and let go anywhere outside it.
- Move to Window
- Moves the document into another Phoenix window as a tab. Dragging a tab onto another window's tab bar does the same. A window closes by itself when its last document moves out.
To keep your work light, a document waiting in a tab lets go of the bitmaps and sounds it has read from its file, and reads them again when you come back to it.
Copying between documents
Copy and paste work between tabs and windows. When what you paste uses symbols, bitmaps or sounds from the other document's library, they come along with everything they use in turn, nested symbols included, as one step you can undo. The same happens when you copy frames, when you drag an item from one window's Library onto another window's stage or Library, and when you copy library items and paste them into another library. If the library already has items with the same names, Phoenix asks what to do:
- Don't replace existing items
- The library's own items are kept, and what you paste uses them.
- Replace existing items
- The library's items take the copies' contents, and everything that uses them shows the copies.
- Keep both
- The copies come in under new names (
Head copy), and what you paste uses those.
Closing and quitting
Closing a tab with unsaved changes asks whether to save it. When you quit (, which closes every window) or close a window with several unsaved documents, Phoenix asks once: Save All, Discard All, Review Each... to be asked about each document in turn, or Cancel. Closing one of several windows leaves the others open.
The next time Phoenix starts, it opens the saved documents that were open when you quit, each in its tab, with the one you were looking at in front. Documents never saved are not reopened; save them or they are left behind. To start with nothing open instead, turn off Reopen documents from last time in .
Templates
To start new documents from one you have set up (a stage size, a layer structure, a character), choose and give it a name. then opens an untitled copy of it, so the template itself is never changed.
A document that uses Phoenix's own features, such as textured brushes, linked palettes or effect layers, keeps them when saved as FLA or XFL: Phoenix writes them in a form it reads back. Other FLA editors show the document without them and drop them if they save it, so Phoenix lists them and asks before such a save. Don't ask again for this document skips the question until Phoenix closes.
Saves are safe: Phoenix writes an FLA or Phoenix document to a temporary file and only replaces the original once the new file is complete, so a crash or full disk in the middle of a save cannot damage your file.
looks through the document for damage, lists errors and warnings, and offers Repair for what can be repaired. shows what changed between this document and another version of it; see Version control.
File formats
| Format | Open | Save | Notes |
|---|---|---|---|
Phoenix document (.phx) | Yes | Yes | The default for new documents. See below. |
FLA file (.fla) | Yes | Yes | The zipped FLA format, from CS5 to the current version. |
| XFL folder | Yes | Yes | The uncompressed form of an FLA. Open its .xfl file or its DOMDocument.xml. |
Binary FLA (.fla) | Yes | As FLA, XFL or PHX | The format before CS5: versions MX 2004, 8, CS3 and CS4, converted when opened. See below. |
SWF movie (.swf) | Yes | As FLA, XFL or PHX; exported | A published movie brought back as a document, for when the FLA is lost. See below. |
Working with FLA files
Phoenix is built to round-trip FLA files. When you open an FLA and save it again, Phoenix keeps everything it found, including settings and data it does not use itself, such as scripts, so the saved file opens elsewhere as it did before. TLF text in older files opens as classic text you can edit; see Text.
Some things Phoenix can do have no place in an FLA. If saving as FLA or XFL would leave something out, Phoenix tells you what before it writes, so nothing is lost silently.
To see what an FLA would hold, choose . The Document Source window shows the document's DOMDocument.xml as Phoenix would write it if you saved now. It is read-only.
FLA files saved before CS5 use a binary format that Phoenix converts when it opens them. Versions MX 2004, 8 and CS3 open in full, with their layers, classic and shape tweens, symbols, bitmaps (on the stage too), static text and sounds. CS4 files can open with parts missing: drawing objects in them cannot be read yet. When part of a file cannot be read, Phoenix opens the rest and lists what is missing. An embedded video keeps only the name of the file it came from. Files older than MX 2004 do not open.
Phoenix saves only the current format, which the old versions cannot open, so Save on a converted file asks first: Save As... to keep the original, or Replace.
Opening SWF movies
When only the published .swf of a piece survives, open it with to bring it back as a document you can edit and save as FLA. Phoenix reads:
- The stage size, frame rate and background color.
- Shapes with their solid, gradient and bitmap fills and their strokes. A shape the movie shows only once goes on the stage as a shape; one it shows again and again becomes a graphic symbol.
- Movie clips and buttons as symbols. The main timeline and each symbol get a layer for each depth of the movie, with a keyframe wherever what is at that depth changes. Instance names, color effects, filters and blend modes come back; masks come back as mask layers.
- Scenes, by the names the movie kept for them, and frame labels, on a layer of their own.
- Bitmaps, including JPEGs with transparency, in the library.
- Sounds: those started on a frame, on their own layers, and the streamed soundtrack, on a Soundtrack layer.
- Text. Static text comes back as the outlines of its letters, and dynamic and input text as text fields.
- 9-slice grids, and the names a movie exported its symbols under, which become the symbols' names and classes.
A movie holds the finished frames, not how they were made, so some things cannot come back. Tweens come back as a keyframe on every frame. Layer names, library folders and symbol names are lost, so Phoenix names layers after their instance names or depths, and symbols by kind and number. Scripts were compiled when the movie was published and cannot be turned back into source, so a frame that had one gets a comment saying so. When Phoenix opens a movie, it tells you what it left out (video, for example).
The document has no file yet: Save asks where to save it, so the movie itself is never replaced.
The Phoenix format
Phoenix documents (.phx) are Phoenix's own format. They hold everything an FLA can, so you can always export a .phx back to the same FLA, and they leave room for features FLA cannot store.
- Fast. A
.phxtypically opens several times faster than the same FLA. - Media kept as is. Images, sounds, video and fonts are stored in their original formats, each stored once even if used many times, and loaded only when needed.
- Robust. Each part of the file is checksummed, so damage to one part does not take the whole file with it.
- Compatible. An older Phoenix opens files from a newer one and keeps any data it does not understand. If a newer feature would change how something looks, the older version opens the file read-only and tells you what is missing.
- Previewable. Each file carries a thumbnail of its first frame.
New documents are saved as .phx unless you choose otherwise under : Phoenix Document, FLA File, or XFL Folder, which suits a studio keeping its files in version control. A new document's first Save As starts in that format.
To convert files without opening them, see the --convert option.
Import
Use :
- Import to Stage...
- Ctrl+R. Adds the file to the library and places it on the current frame.
- Import to Library...
- Adds the file to the library only.
- Import Video...
- Brings in a video as a reference to animate over. See Reference video.
- Open External Library...
- Ctrl+Shift+O. Opens another file's library beside this one, to copy items from. See Libraries of other documents.
- Import Animatic...
- Brings in an animatic's cut (EDL or Final Cut XML) as shot labels, boards and audio. See Start from the animatic.
| Kind | Formats |
|---|---|
| Images | PNG, JPEG, GIF, BMP |
| Layered images | Photoshop (PSD and PSB), RGB, CMYK or grayscale, 8, 16 or 32 bits |
| Vector artwork | SVG, Illustrator (AI), EPS and PostScript, PDF |
| Sound | WAV, AIFF, MP3, FLAC, Ogg |
| Video (reference) | MP4, MOV, M4V, AVI, MKV, WebM, FLV, WMV, MPEG |
If you import one image from a numbered sequence, such as walk_0001.png, Phoenix offers to import the whole sequence as consecutive keyframes.
Photoshop files
Import to Stage turns each layer of a PSD into a layer of its own, named as it was, above the current layer, with the layer's pixels as a bitmap in the library and placed where they were on the canvas. Groups become layer folders, hidden layers stay hidden, and a layer's opacity and layer mask are kept in its pixels. A layer with a blend mode (Multiply, Screen, Overlay, Darken, Lighten, Difference, Linear Dodge, Subtract or Hard Light) is placed inside a movie clip that blends the same way, since only movie clips can blend; other blend modes come in as Normal, and Phoenix says which. Import to Library adds just the bitmaps.
Large documents (PSB), 16- and 32-bit documents and CMYK documents are read too; their colors are brought to 8-bit RGB. Adjustment and fill layers have no pixels of their own and are left out, and layers clipped to the layer below come in unclipped.
SVG, Illustrator, EPS and PDF files
Each filled or stroked path becomes a drawing object with its fill and stroke color and stroke width, images become bitmaps in the library placed where they were, and text becomes static text. On the stage they are grouped as one piece of artwork, in the order they were drawn; Import to Library makes a graphic symbol named after the file instead.
- SVG: paths, rectangles, circles, ellipses, lines, polylines and polygons, with their groups, transforms and opacity, styled by attributes, the
styleattribute or the style sheet's classes; linear and radial gradients, which become gradient fills;useand symbols; images, embedded or in files beside the SVG; and text, with its font, size, weight and color. - Illustrator and PDF: an Illustrator file is read through the PDF copy it carries, which Illustrator saves by default; for a PDF, the first page is read. Paths with their colors and opacity, spot (Pantone) colors, clipping masks, grouped and placed artwork, gradients, repeating pattern fills (drawn tile by tile), and images, palette images among them. Text comes in as text you can edit, a line at a time where the file placed it, in the font the file names when you have it installed (another font stands in when you do not).
- Illustrator files without a PDF copy: a file saved with Create PDF Compatible File turned off, and files from Illustrator 8 and older, are read in Illustrator's own format: paths and compound paths, colors (process and spot), gradients, clipping masks and point text; hidden layers are left out.
- EPS and PostScript: an EPS that Illustrator saved is read through the Illustrator artwork inside it. Any other EPS or PostScript file (from FreeHand, Photoshop, CorelDRAW and the like) is run as a PostScript program, and what it paints comes in: paths, fills and strokes in gray, RGB, CMYK and spot colors, clipping, images and text. The page is the file's bounding box.
When a file uses something Phoenix cannot bring in, such as a kind of image it does not read, the import says what was left out.
You can also drag images, sounds, PSD, SVG, Illustrator and EPS files from your desktop. Dropped on the stage, they are placed where you drop them; dropped elsewhere, they go into the library.
(Ctrl+V) also takes what other applications copy: an image, vector artwork copied as SVG or PDF, which comes in as it would from a file, or files copied in your file manager, which are imported to the stage. Copying in Phoenix puts an image and an SVG of the selection on the clipboard, for pasting into other applications.
Trace Bitmap
To turn a picture into artwork you can edit, select it on the stage and choose , or right-click it and choose Trace Bitmap. Areas of like color become fills in their average color, and neighboring areas share their edges, so nothing shows through between them.
- Color threshold
- How different two colors may be and still make one area, from 1 to 500: the red, green and blue differences added together. Higher makes fewer, larger areas.
- Minimum area
- Areas smaller than this many pixels join the neighbor they share the most edge with. Raise it to clear away specks.
- Curve fit
- How closely the outlines follow the picture. Pixels and Very Tight keep every step of the pixels. From Tight on, rounds become smooth curves and straight sides stay straight, with fewer points the smoother you go.
Preview traces the bitmap on the stage with the settings as they are, so you can judge the result in place, zoomed in if you like. The dialog then says how many areas and points the trace made, and suggests what to change when there are far too many or too few. Turn on Auto Preview to trace again whenever a setting changes: it waits until you stop dragging a value, so scrubbing stays smooth.
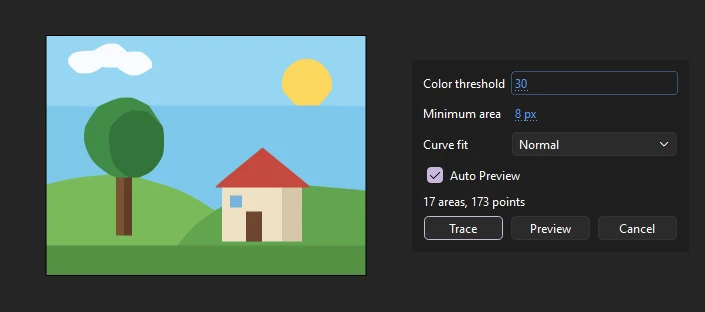
Trace keeps the result as one step you can undo, in the bitmap's place and position, and the bitmap stays in the library. Cancel puts the bitmap back and leaves nothing in the undo history. With several bitmaps selected, all of them are previewed and traced with the same settings.
Right-clicking a bitmap also offers Swap Bitmap, to show another bitmap from the library in its place.
Choosing Trace Bitmap settings
To try it, download the sample picture (320 by 240 pixels) and import it with . It is flat colors with soft edges and a little noise, like a scanned drawing or a compressed export. Here it is traced at three color thresholds:
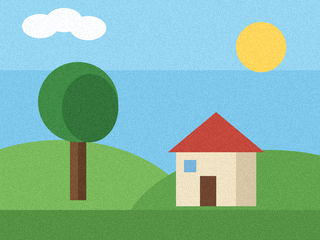
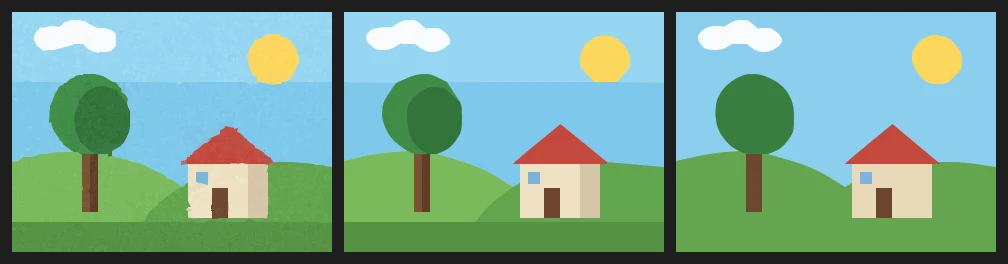
- Too low (10): the noise splits every flat color into specks, 1,058 areas in all. It is slow to draw and impossible to edit.
- Right (30): each flat color is one area, 17 in all, and the tree's shadow side stays apart from its lit side.
- Too high (100): 10 areas are left. The two blues of the sky have run together, and so have the two greens of the tree, the hills, and the lit and shaded sides of the house.
For this picture, the ideal trace is Color threshold 30, Minimum area 8 px and Curve fit Normal, as shown above: 17 areas and 173 points, with the sun and the tree as smooth curves and the house as straight lines.
For a picture of your own, turn on Auto Preview and zoom in on a detailed part of the stage. Raise Color threshold until the shades of each flat color become one area, and stop before colors you want to keep apart run together; the area count falls steeply as specks merge, then levels off. Then raise Minimum area if specks are left. Last, choose a Curve fit with as few points as still follow the shapes.
Trace Bitmap suits flat-colored artwork: logos, cartoons and scanned inked drawings. A photograph or a gradient becomes many areas at any setting.
Auto-save and recovery
While a document has unsaved changes, Phoenix writes a recovery copy in the background, for every document open, in a tab in front or not. It never touches your own file. Choose how often under : every minute, every 2 (the default), 5 or 10 minutes, or off.
If Phoenix closes without saving, for example after a crash or power cut, the next time it starts the Recover Unsaved Work dialog lists every recovery copy, newest first, with the document's name and when the copy was made:
- Recover
- Opens the selected copies, each in a tab of its own, as the documents they came from, unsaved. Save them to keep them. Any copies not selected are offered again next time.
- Discard
- Deletes the selected copies.
- Discard All
- Deletes every copy, after asking.
- Later
- Keeps the copies and asks again next time.